How to Run a Workshop Online: Planning, Facilitation and Follow-up
A digital workshop succeeds or fails with its preparation. Here you learn how to plan a workshop on an online whiteboard, who needs which permissions on the board, how to control the session and what happens with the results afterwards.



Are you planning a workshop with participants in different locations? Then you need a shared space where everyone can write notes, sketch and vote at the same time. An online whiteboard takes the role of pinboard, flipchart and facilitation kit in one.
In this post, we show you step by step how to prepare, facilitate and follow up on a workshop with Collaboard. It works online, hybrid and on site, for example on an interactive display in the meeting room.
Which whiteboard tool works for workshops with remote participants?
For workshops with participants in different locations, you need an online whiteboard that is easy for guests to join and gives you as the facilitator control over the session. Look for these points:
- A shared space for notes and sketches: sticky notes, cards, shapes, freehand drawing and images on an infinite canvas.
- Easy access for guests: external participants should be able to join via a link without creating an account first.
- Facilitation features: presentation mode, a timer, voting and a way to bring all participants to the same spot.
- Roles and permissions: you decide who facilitates, who edits and who only watches.
- Preparation features: templates, hiding and revealing content, locking and pinning objects.
- Data protection and hosting: especially for client workshops or internal strategy topics, you should know where the data is stored.
Collaboard covers all of these and is built for workshops and trainings. Depending on your choice, your data is stored in Switzerland, the Netherlands, a sovereign cloud in Germany or on your own servers. For a first workshop, the free plan is enough.
Preparing your workshop step by step
How well a workshop goes is largely decided before the first session. When the activities are prepared, you can focus completely on facilitation and on the participants. The second benefit: everything created in the workshop is digital right away. No more photos of flipcharts or typing up notes.
1. Define the goal and topics
Decide which topics the workshop covers and what result you want at the end. The agenda and the right activities follow from that. You can collect the topics on the board in advance and choose with your client which ones make it into the workshop.
2. Invite participants
Once you know whether the workshop takes place online, hybrid or on site, send out the invitation. Add the board link directly to the calendar invite or share it at the start of the session. Guests don't need an account and are on the board within seconds.
If the workshop takes place on site, simply create a QR code for the board in Collaboard. Participants scan it with their phone or tablet and join right away, without typing a link.
3. Map the agenda and structure on the board
Place the agenda where everyone can see it, so people always know what comes next. You don't have to reveal any surprises, of course.
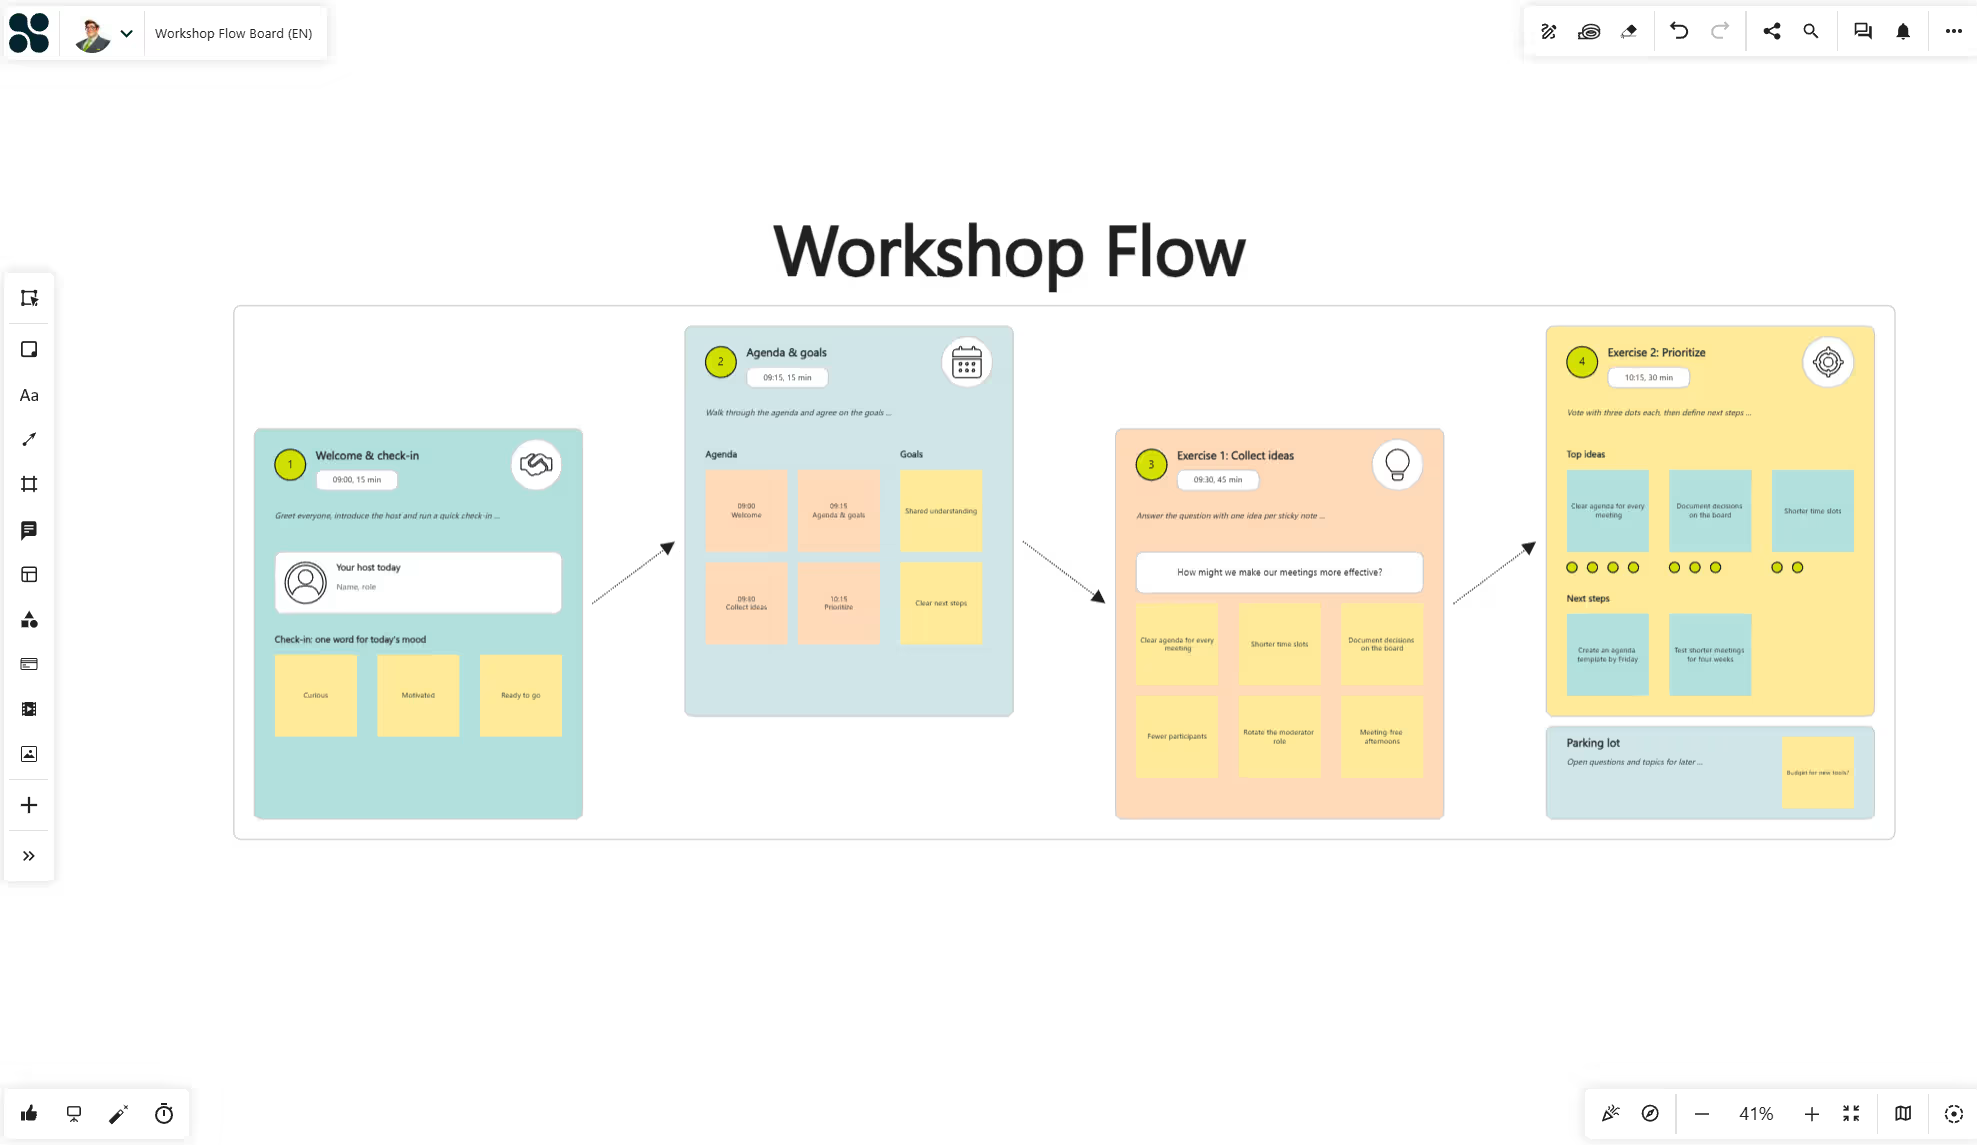
Divide the board into areas, one per activity, for example with frames, and connect them with arrows into a workshop path. That way you and your participants see at a glance in which order the activities follow.
Collaboard tip: select each area and turn it into a Quick Link. Quick Links appear in an overview in the order of your agenda, and you can link to them from any element on the board. Also set a start view, so all participants begin at the same spot on the board.
4. Prepare materials and activities
On the board, you can prepare everything you would otherwise bring in your facilitation kit:
- Cards and sticky notes
- Images, videos and audio recordings
- Prepared drawings, similar to a flipchart
- Shapes and tables
- Documents such as PDF, Word and PowerPoint
Also plan a small practice area at the start. People who are new to online whiteboards can spend two minutes there learning to create a note, type and zoom. After that, the tool no longer gets in the way.
Example: setting up a feedback board
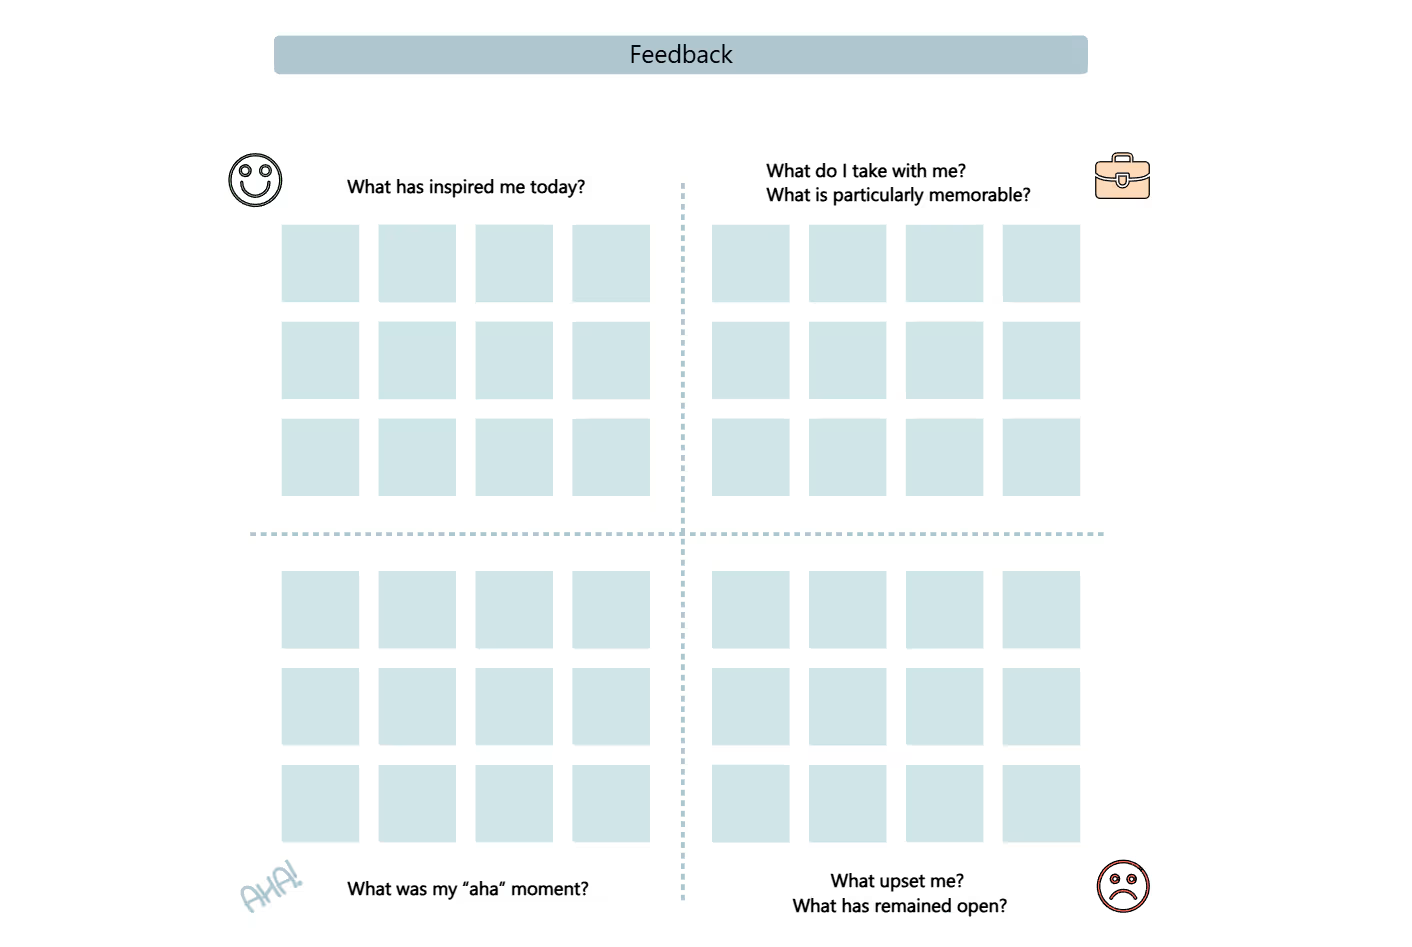
A feedback round shows how to prepare an activity so that participants only need to write.
- Mark the area: mark the area for the feedback round either with a shape as a visual boundary or with a frame. The advantage of a frame: all objects inside it become part of the frame, so you can easily move the whole area with all its content on the board. If you use a shape, lock it so nobody moves it.
- Visualize the topic: add a suitable image so the activity is recognizable on the board at once. Lock the image as well.
- Prepare the cards: place empty cards in the area, for example one per participant. You set the same font and font size for all of them.
- Pin the cards: pinned cards keep their position and size, but participants can type into them directly. This prevents anyone from enlarging, shrinking or accidentally moving cards.
- Create a Quick Link: select the finished area and turn it into a Quick Link. Now you can jump to the feedback round from the agenda or any other element.
We explain the difference between locking and pinning, and more ways to use them, in Lock or Pin? How to Keep Whiteboard Content in Place.
Roles and permissions in a workshop
In a video call, you can mute participants. On a whiteboard, you use roles instead to control who can do what. Sort out the roles before the workshop, so you don't have to think about them during the session.
How to use the roles in a workshop:
- Facilitate in pairs: give your co-facilitator the facilitator role as well. One person can lead the discussion while the other starts the timer or reveals content.
- Invite external participants: guests join as editors without creating an account. They can't facilitate, which is reserved for registered users.
- Include observers: anyone who should only watch gets the viewer role. This keeps the board tidy.
- When things get out of hand: if someone keeps working in the wrong place, you can temporarily remove their editing rights.
- Organize workshop series: for recurring workshops with the same team, create a space. All boards in the space inherit its permissions, and when someone leaves the team, you remove their access to all boards with one click.
Facilitating the workshop: your digital facilitation kit
Collaboard puts the most important facilitation tools right on the board.
- Attention feature: brings individual participants or everyone to the spot on the board where you are.
- Presentation mode: everyone follows you on the board and watches. You can keep editing content and highlight things with the highlighter. You don't need to share your screen. As soon as you end the mode, everyone can work on the board again.
- Timer: sets a clear time limit for an activity. Everyone sees the remaining time, and a notice appears shortly before it runs out.
- Focus mode: hides the controls so only the board content is visible.
- Voting and rating: you decide how many votes each person gets, start and end the vote, and Collaboard summarizes the result. With rating, participants give 0 to 5 stars, and Collaboard calculates the average for each element.
Controlling the session
Besides the facilitation tools, a few settings decide what participants can see and do at which point:
- Hide and reveal content: before the workshop, hide everything that comes later. As the facilitator, you still see the hidden content and can even edit it during the session. Reveal it with a few clicks as soon as the next phase begins.
- Lock the structure, pin the input fields: locked frames and instructions stay unchanged, while pinned cards stay in place and can still be written on. Unpin them as soon as the group starts clustering.
- Time your phases: short, clearly limited phases keep the energy up. Plan a time for each activity and start the timer visibly for everyone.
- Bring everyone together: before each new phase, use the attention feature or presentation mode to bring everyone to the same spot and explain the next task.
After the workshop: securing results and moving on
The biggest advantage of a digital workshop shows after the session: the results are already there and don't need to be photographed or typed up. These steps turn them into a clean basis for further work.
- Tidy up the board: remove empty cards and practice areas, merge clusters and add short titles so people who weren't there understand the result.
- Lock the results: lock the finished areas so nobody changes anything by accident after the workshop.
- Adjust access: set participants who no longer need to edit to viewer. Remove external guests who no longer need access.
- Share and export the results: share the board link with everyone involved or export the board as a PDF or an image, for example for minutes or a presentation. You can also export the text content as a CSV file and work with it in Excel or other tools.
- Turn results into tasks: in Collaboard, you can turn sticky notes directly into tasks with owners and due dates. That keeps the next steps connected to the workshop result.
- Prepare the next session: many workshops run over several sessions. On the same board, you simply continue where the last session ended. If a format works well, save the board as a template for the next workshop.
Preparing and evaluating workshops with AI
You can hand a large part of the preparation to AI. With the Collaboard MCP Server, you connect AI assistants such as Claude or ChatGPT to Collaboard. You describe the goal, participants, duration and methods, and the AI builds a complete workshop board with agenda, areas, instructions and prepared sticky notes. You review the result, adjust it and lock or pin the elements as usual.
AI also helps after the workshop. It reads the content of the whole board, summarizes the results, identifies themes and suggests next steps. In a few minutes, you have an evaluation you can share with the participants.
Make sure you use an AI tool your organization has approved, especially for confidential content. The MCP Server is available in Collaboard Advanced and Enterprise.
Conclusion: plan, facilitate and follow up on workshops digitally
With an online whiteboard, you run workshops online, hybrid or on site without a break between preparation, session and result. Most of the work goes into preparation: a clearly structured board, prepared activities and the right roles. In return, you can focus on the group during the session, and the results are available right away. For workshop series, you simply pick up where you left off in the next session.
On This Page

Start for free with Collaboard
Create your first online whiteboard, invite others and start collaborating visually.
You can use Collaboard for free and upgrade later whenever your needs grow.
*No credit card required
Michael Görög
Co-Founder Collaboard
Michael Görög is co-founder of Collaboard and is passionate about digital collaboration, visual work and the future of teamwork. He regularly shares practical insights on online whiteboards, collaboration methods, AI and new ways of turning ideas into action.

Frequently asked questions
Any questions? We are here to help.
Prepare the board before the session: agenda, one area per activity and prepared cards. During the session, guide the group from phase to phase with presentation mode and the attention feature, time the activities with the timer and reveal content only when it's needed. At the end, secure the results directly on the board.
Look for a shared space for notes and sketches, guest access without an account, facilitation features such as a timer, voting and presentation mode, clear roles and permissions, and transparent hosting. Collaboard offers all of this and stores your data in Switzerland, the Netherlands, a sovereign cloud in Germany or on your own servers.
Create a link or invite participants by email. You can invite them as guests. Guests don't need an account and are on your board within seconds.
Create a QR code for the board in Collaboard. Participants scan it with their phone or tablet and join right away, without typing a link.
Usually an owner who organizes the board, one or more facilitators with access to the facilitation features, and participants as editors. Anyone who should only watch gets the viewer role. Guests can be editors, but not facilitators.
Create a clear structure so participants know where each activity takes place. Lock content that shouldn't be changed, and pin the cards participants are supposed to write on.
Before the workshop, hide all content that comes later. As the facilitator, you still see it and can reveal it with a few clicks during the session.
Yes. With the Collaboard free plan, you can create boards and invite participants. You can find which facilitation features are included in which plan on the pricing page.
An online flipchart is usually a limited page for writing and drawing. An online whiteboard gives you an infinite canvas where you can map the whole workshop with all activities, cards, images and results.
All content is digital right away, participants collaborate in real time from anywhere, and in workshop series you can continue where you left off. Follow-up takes much less time because there are no photos to document and no notes to type up.
Yes. With the Collaboard MCP Server, an AI assistant such as Claude or ChatGPT can build a complete workshop board with agenda, areas and activities. After the workshop, the AI can read the board content and summarize the results.
You can export a board or individual areas as a PDF or an image, for example for minutes. You can also export the text content as a CSV file and work with it in Excel or other tools.
Subscribe to the newsletter
Stay up to date with the latest tips and news on collaboration.
Start your next whiteboard now
Get a free trial of Collaboard with up to 3 boards and five people per session. All key features are available for you to try out.